Ever noticed a suspicious clicking sound when you turn the steering wheel, or perhaps spotted a greasy mess near your front wheels? These could be signs of a damaged steering rack gaiter, a small but vital component that protects your vehicle's steering system from dirt, debris, and moisture. Ignoring it can lead to costly repairs down the road.
Let's be honest, car maintenance can feel daunting. The thought of tackling anything beyond checking the oil might conjure images of endless trips to the auto parts store, wrestling with unfamiliar tools, and the gnawing fear of making things worse. And who has the time to spend hours under a car, especially when You Tube tutorials often seem to skip crucial steps?
This guide aims to demystify the process of replacing a steering rack gaiter. We'll break down each step in plain language, providing clear instructions and helpful tips to empower you to tackle this repair with confidence. We will go over everything from preparing your workspace to properly securing the new gaiter, ensuring a successful and safe outcome.
In this article, we'll cover the essential tools you'll need, a detailed step-by-step guide to removing the old gaiter and installing the new one, and crucial safety precautions to keep in mind. We will also look at common problems and how to avoid making them, helping you avoid costly mistakes. This is more than just a set of instructions; it's a pathway to understanding your vehicle better and saving money on auto repairs.
Tools and Materials Needed
The right tools can make all the difference. I remember the first time I tried to tackle a car repair armed with nothing but a rusty wrench and a prayer. It ended in frustration, a trip to the mechanic, and a lighter wallet. Learning from that experience, I now meticulously gather everything I need before even thinking about touching a bolt. For replacing a steering rack gaiter, you’ll want to have the following: a jack and jack stands (never work under a car supported only by a jack!), wheel chocks, the correct replacement gaiter (check your vehicle's make and model!), wrenches, pliers (including side cutters or a knife to remove the old clamps), a screwdriver, grease, and safety glasses. It also helps to have some penetrating oil on hand, just in case any bolts are stubborn. Having these essentials will not only make the job easier but also safer, preventing potential injuries and ensuring the repair is done correctly. The type of clamp is also important. Some gaiters come with the oem type that requires a special tool to crimp, others come with just hose clamps. Always make sure that if they are not the oem type, use hose clamps that are smooth on the inside as to not cut or dig into the gaiter. It's best to keep a variety of hand tools handy as every vehicle is different and what works on one, may not work on another.
Step-by-Step Instructions
Replacing a steering rack gaiter involves a series of carefully executed steps. First, you must secure the vehicle using wheel chocks and raise it with a jack, supporting it safely with jack stands. Then, remove the wheel on the side where you’re replacing the gaiter. Next, locate the steering rack gaiter, which is a rubber boot covering the inner tie rod end. Carefully cut or pry off the old clamps holding the gaiter in place. Slide the old gaiter off the steering rack and inner tie rod. Clean the area thoroughly, removing any dirt or debris. Apply a small amount of grease to the inner tie rod to help the new gaiter slide on more easily. Slide the new gaiter into place, ensuring it is properly seated. Secure the new gaiter with the new clamps, making sure they are tight but not overtightened. Finally, reinstall the wheel, lower the vehicle, and remove the wheel chocks. Double-check everything to ensure it is secure before taking the vehicle for a test drive. It is important to pay close attention to the location of the components as this will make the job easier. The more you pay attention to how it comes apart, the easier it will be to put it back together.
Common Problems and Solutions
One of the most common issues is encountering rusted or seized bolts. Penetrating oil is your best friend in these situations. Apply it liberally and let it sit for a while before attempting to loosen the bolt. Another problem is damaging the inner tie rod end while removing the old gaiter. Be gentle and use the correct tools to avoid this. Make sure you are prepared for any type of problem that may come your way. Sometimes, the new gaiter might be difficult to slide onto the steering rack. Applying a small amount of grease can help. Also, ensure that you are using the correct gaiter for your vehicle; an incorrectly sized gaiter will not fit properly. It is also very important to make sure you get new clamps as reusing the old ones may cause leaks. If you don't have a shop or tools, it is best to take it to a professional. You are paying them for their experience and tools, which may ultimately save you money.
Safety Precautions
Safety should always be your top priority. Before starting any work on your car, make sure the parking brake is engaged and the wheels are chocked. Always use jack stands to support the vehicle – never rely solely on a jack. Wear safety glasses to protect your eyes from debris. If you are using power tools, wear appropriate hearing protection. Work in a well-ventilated area, especially if you are using chemicals or solvents. Disconnect the negative terminal of the battery to prevent electrical shorts. And most importantly, if you are unsure about any step, consult a professional mechanic. Your safety and the safety of others depend on it. Consider taking photos of how parts are attached to the vehicle so that you can compare them to how you put them back on. A lot of times, taking things apart is easy, putting them back together can be difficult. If you take your time and pay attention to how it is put together, you can be confident when you put it back together.
Selecting the Right Gaiter
Choosing the correct replacement gaiter is crucial for a successful repair. Start by checking your vehicle’s make, model, and year. Many auto parts stores offer online lookup tools that can help you find the correct part based on your vehicle's specifications. Pay attention to the gaiter’s dimensions and material. It should be a snug fit over the steering rack and inner tie rod end, and it should be made of a durable material that can withstand the elements and constant flexing. Consider purchasing from a reputable brand to ensure quality and longevity. Always verify that the gaiter comes with new clamps, as reusing old clamps can lead to leaks and premature failure. If you are unsure, consult with a knowledgeable auto parts store employee or a mechanic to ensure you get the right part for your vehicle. There are different qualities of parts and different prices, so consider this when purchasing. A cheap part may not last long and you will have to replace it again, a high end part may be unnecessarily expensive.
Tips for a Smooth Replacement
Preparation is key to a smooth steering rack gaiter replacement. Before you even start, gather all the necessary tools and materials. Clean your workspace and ensure you have adequate lighting. Take photos of the steering rack and gaiter before you start disassembling anything; this can be a lifesaver when it comes time to reassemble everything. Use penetrating oil liberally on any rusted bolts or clamps. When removing the old gaiter, be careful not to damage the inner tie rod end. Apply a small amount of grease to the inner tie rod to help the new gaiter slide on more easily. When installing the new clamps, make sure they are tight but not overtightened, as this can damage the gaiter. After completing the repair, double-check everything to ensure it is secure. Finally, take your vehicle for a test drive to ensure the steering feels normal. Taking your time and paying attention to detail can prevent costly mistakes and ensure a successful repair. If you are feeling uncertain about how to properly secure a clamp, consider watching a You Tube video that shows how to do so.
Understanding Gaiter Function
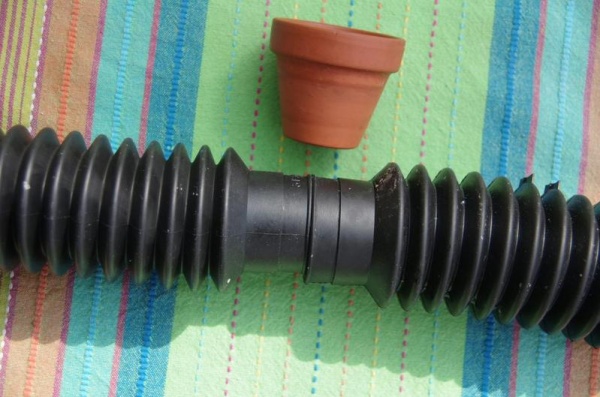
The steering rack gaiter is a small but mighty component that plays a crucial role in protecting your vehicle’s steering system. It is a flexible, rubber boot that covers the steering rack and inner tie rod end, preventing dirt, debris, and moisture from entering the steering mechanism. This protection is essential for maintaining the smooth and efficient operation of the steering system, as contaminants can cause wear, corrosion, and eventual failure of critical components. A damaged or torn gaiter can allow these contaminants to enter, leading to costly repairs down the road. Therefore, regularly inspecting and replacing the steering rack gaiter is an important part of vehicle maintenance. The gaiter is the main protection from the elements for the steering rack, protecting it from water, salt, dust, and other things that would cause it to wear out quickly.
Fun Facts About Steering Systems
Did you know that the first automobiles didn’t have power steering? Drivers had to wrestle with the steering wheel, especially at low speeds. Power steering, which uses hydraulic or electric assistance to make steering easier, became widely popular in the mid-20th century. The steering rack, a key component in many modern vehicles, converts the rotational motion of the steering wheel into the linear motion needed to turn the wheels. The steering rack gaiter, while seemingly insignificant, plays a vital role in protecting this complex mechanism. In fact, a damaged gaiter can lead to the premature failure of the entire steering rack, costing you hundreds or even thousands of dollars in repairs. So, the next time you’re driving, take a moment to appreciate the intricate engineering that makes steering your car so effortless. Steering has evolved over time to be what we know today, and it will continue to evolve as technology moves forward.
How to Inspect Your Gaiters Regularly
Regular inspection of your steering rack gaiters can help you catch potential problems early, preventing costly repairs. Start by visually inspecting the gaiters for any signs of damage, such as cracks, tears, or punctures. Also, check for any grease or fluid leaking from the gaiter, which could indicate a tear or a loose clamp. To get a better view, turn the steering wheel from lock to lock, which will extend and retract the steering rack. This will allow you to inspect the entire surface of the gaiter. If you notice any damage, it’s best to replace the gaiter as soon as possible. During routine maintenance, such as oil changes or tire rotations, ask your mechanic to inspect the gaiters as well. They can spot subtle signs of wear that you might miss. Consistent inspections will give you peace of mind and will help you maintain a safe and reliable vehicle.
What Happens If You Don't Replace It?
Ignoring a damaged steering rack gaiter can have serious consequences. Without the protective barrier of the gaiter, dirt, debris, and moisture can enter the steering rack, causing wear and corrosion. Over time, this can lead to the failure of the steering rack, which can compromise your vehicle’s handling and safety. A failing steering rack can cause symptoms such as loose steering, difficulty turning the wheel, and unusual noises. In extreme cases, the steering rack can seize completely, leaving you with no control over the vehicle. Replacing a steering rack can be a costly repair, often involving hundreds or even thousands of dollars. Replacing the gaiter is significantly less expensive and can prevent these costly repairs. Don’t underestimate the importance of this small component – it plays a vital role in protecting your vehicle’s steering system and ensuring your safety on the road.
Listicle of Signs Your Steering Rack Gaiter Needs Replacing
1.Visible Damage: Obvious cracks, tears, or punctures in the gaiter are clear indicators that it needs to be replaced.
2.Grease Leakage: If you notice grease or fluid leaking from the gaiter, it's a sign that the seal has been compromised.
3.Unusual Noises: Clicking or popping sounds when turning the steering wheel can indicate a problem with the steering rack, often caused by a damaged gaiter.
4.Loose Steering: If your steering feels loose or unresponsive, it could be due to a failing steering rack, which may be linked to a damaged gaiter.
5.Corrosion: Rust or corrosion on the steering rack itself is a sign that the gaiter has been compromised for some time.
6.Contamination: Excessive dirt and grime on the steering rack can point to a damaged gaiter that is no longer providing adequate protection.
7.Age: Even without visible damage, gaiters can deteriorate over time and should be inspected and potentially replaced as part of routine maintenance.
8.Preventative Maintenance: Replacing the gaiter during other front end repair is a good measure to take. It will ensure it's longevity and save in labor costs.
Question and Answer
Q: How often should I inspect my steering rack gaiters?
A: It's a good idea to inspect your steering rack gaiters at least once a year, or during routine maintenance like oil changes or tire rotations.
Q: Can I drive with a damaged steering rack gaiter?
A: While you can technically drive with a damaged gaiter, it's not recommended. The longer you drive with a damaged gaiter, the greater the risk of damage to the steering rack.
Q: Is it difficult to replace a steering rack gaiter myself?
A: Replacing a steering rack gaiter is a relatively straightforward repair, but it does require some mechanical knowledge and the right tools. If you're not comfortable working on your car, it's best to take it to a professional mechanic.
Q: How much does it cost to have a mechanic replace a steering rack gaiter?
A: The cost of having a mechanic replace a steering rack gaiter can vary depending on the make and model of your car, as well as the labor rates in your area. Generally, you can expect to pay between $100 and $300 for this repair.
Conclusion of How to Replace a Steering Rack Gaiter: Step-by-Step Instructions
Replacing a steering rack gaiter is a manageable task with the right tools, clear instructions, and a focus on safety. By understanding the function of the gaiter, following the step-by-step guide, and taking necessary precautions, you can protect your vehicle's steering system and save money on costly repairs. Regular inspections and prompt replacement of damaged gaiters will ensure smooth steering and a safe driving experience. This article has provided a thorough understanding of the process, empowering you to approach this repair with confidence.