Is your car's steering feeling a little loose? Hearing some unsettling clunking noises when you turn? The culprit might be your inner tie rods. While a trip to the mechanic is always an option, tackling this repair yourself can save you a significant amount of money and give you a real sense of accomplishment. It might sound intimidating, but with the right tools and guidance, it's a very achievable DIY project.
Let's face it, car repairs can be a daunting prospect. The fear of the unknown, the potential for making mistakes, and the sheer number of specialized tools involved can easily lead to procrastination. Steering issues, in particular, can be unnerving because they directly impact your safety and control over your vehicle. The thought of something going wrong with your steering system can keep you up at night.
This guide aims to empower you with the knowledge and confidence to replace your inner tie rods safely and effectively. We'll break down the process step-by-step, covering everything from identifying the problem to torquing everything down correctly. We will focus on how you can save money by doing the repair yourself, the tools you'll need, and the important safety precautions to take. So grab your wrenches, and let's get started!
In this comprehensive guide, we've walked through the process of replacing inner tie rods, covering everything from identifying symptoms of failing tie rods, gathering the necessary tools, step-by-step instructions for the replacement process, and ensuring proper alignment afterward. We've highlighted safety considerations throughout, emphasizing the importance of using proper equipment and techniques. By following this guide, you can confidently tackle this repair and save money on labor costs, ensuring your vehicle's steering is safe and responsive. Remember to always double-check your work and consult a professional if you're unsure about any step.
Diagnosing a Bad Inner Tie Rod
The ability to correctly diagnose a bad inner tie rod is paramount, and this skill is usually learned through experience. I remember back in high school, my first car, a beat-up old sedan, developed a strange wobble in the front end. I initially suspected a tire issue, but after rotating them and still experiencing the problem, I knew something else was amiss. The steering felt vague, and there was an unsettling clunking noise whenever I went over bumps or turned sharply.
After much research, watching countless videos, and consulting with a mechanically inclined friend, I learned about tie rods and their role in steering. Armed with this new knowledge, I jacked up the car and started poking around. Sure enough, I discovered excessive play in the inner tie rod on the driver's side. The ball joint was loose, and the whole assembly rattled when I shook it.
Symptoms of a failing inner tie rod can include: loose or sloppy steering, uneven tire wear, vibrations in the steering wheel, and clunking noises, especially when turning. A visual inspection can often reveal a torn boot or excessive play in the joint. Remember, accurate diagnosis is crucial to avoid unnecessary repairs. If you're unsure, it's always best to consult with a qualified mechanic. Regular vehicle inspections can help identify potential problems early, preventing more significant damage and ensuring your safety on the road. Look for signs of wear and tear and address them promptly.
Tools and Materials You'll Need
Having the correct tools and materials is half the battle when it comes to DIY car repairs. Trying to make do with the wrong tools can lead to frustration, wasted time, and even damage to your vehicle. Replacing inner tie rods requires a specific set of equipment, including a tie rod removal tool (also known as an inner tie rod tool), wrenches, sockets, a torque wrench, jack stands, and safety glasses.
In addition to the tools, you'll also need replacement inner tie rods, new cotter pins, grease, and thread locker. Make sure to purchase high-quality parts from a reputable supplier to ensure durability and proper fitment. It's also a good idea to have a repair manual or access to online resources that provide detailed instructions and torque specifications for your specific vehicle.
Safety should always be your top priority, so don't forget to wear safety glasses to protect your eyes from debris and use jack stands to support the vehicle securely. Working under a car supported only by a jack is extremely dangerous. Taking the time to gather all the necessary tools and materials before you start the job will save you time and hassle in the long run.
A Brief History of Tie Rods
The evolution of tie rods mirrors the development of the automobile itself. Early cars relied on rudimentary steering systems, often using simple levers and linkages to connect the steering wheel to the wheels. As vehicles became more sophisticated, so did their steering mechanisms. Tie rods emerged as a crucial component, providing a more precise and reliable way to control the direction of the wheels.
The basic design of tie rods has remained relatively unchanged over the years, consisting of a steel rod with ball joints at each end. However, materials and manufacturing processes have improved significantly, resulting in stronger, more durable tie rods that can withstand the stresses of modern driving conditions.
Interestingly, the concept of using rods to transmit force and motion dates back centuries. Ancient civilizations used similar principles in various machines and mechanisms. While the specific application to vehicle steering is relatively recent, the underlying concept is deeply rooted in engineering history. Understanding the history of tie rods can provide a deeper appreciation for the ingenuity and innovation that have shaped the automotive industry.
Hidden Secrets of Inner Tie Rod Replacement
One of the less discussed aspects of inner tie rod replacement is the importance of proper torque. Over-tightening or under-tightening the tie rod end can lead to premature failure and compromise steering safety. Always consult your vehicle's repair manual for the correct torque specifications and use a calibrated torque wrench to ensure accuracy.
Another often overlooked detail is the alignment procedure that should follow tie rod replacement. Even a minor misalignment can cause uneven tire wear and affect handling. A professional wheel alignment is highly recommended after any steering component replacement.
Furthermore, inspecting the condition of the steering rack boots is crucial. These boots protect the steering rack from dirt and debris. If they are torn or damaged, it can lead to premature wear and failure of the steering rack itself. Replacing the boots at the same time as the tie rods is a proactive measure that can save you money in the long run. By paying attention to these "hidden secrets," you can ensure a successful and long-lasting repair.
Recommendations for Inner Tie Rods
When choosing replacement inner tie rods, it's essential to consider quality and durability. Opt for reputable brands known for their high standards and rigorous testing. Avoid cheap, generic parts, as they may not meet OEM specifications and could fail prematurely.
Consider investing in a specialized inner tie rod tool if you plan on performing this repair regularly. These tools make the job much easier and safer. There are several different types available, so choose one that is compatible with your vehicle and comfortable to use.
Before starting the repair, take the time to thoroughly inspect the surrounding components, such as the steering rack and outer tie rod ends. If these parts show signs of wear or damage, it's best to replace them at the same time. This will save you time and money in the long run and ensure that your steering system is in optimal condition. Always remember to follow the manufacturer's recommendations and guidelines for installation and maintenance.
Step-by-Step Guide to Replacing Inner Tie Rods
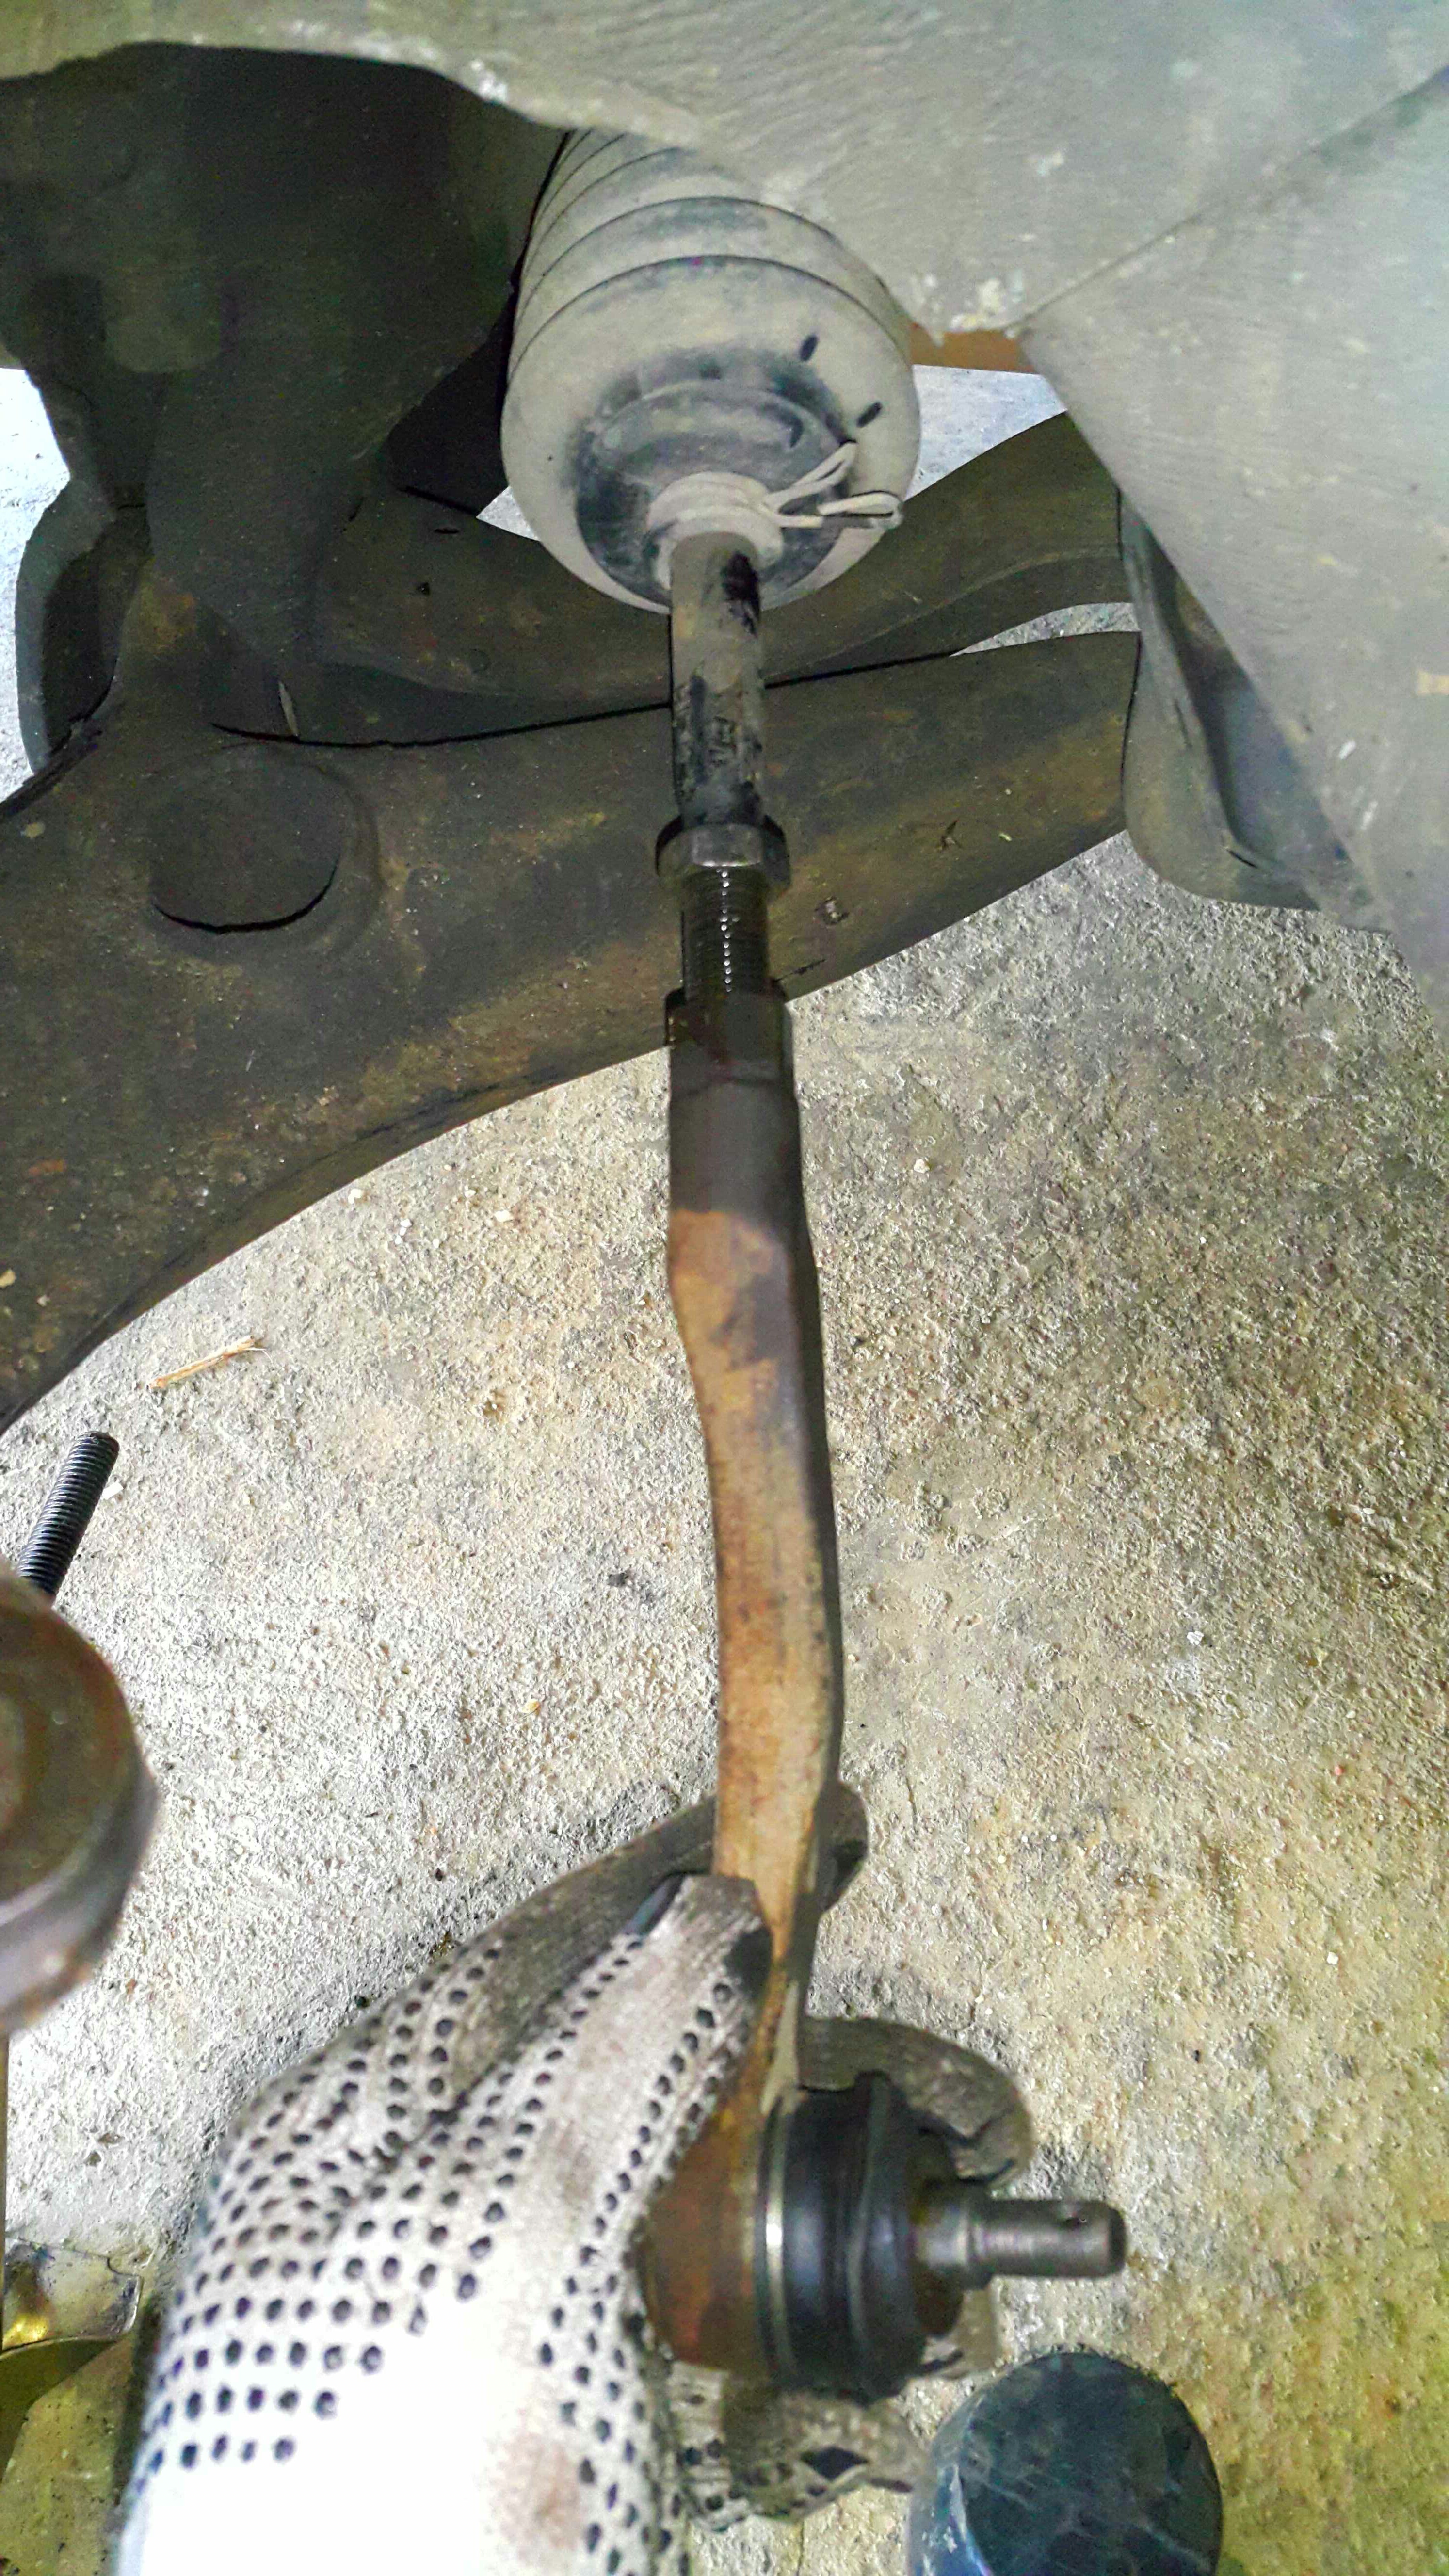
Replacing inner tie rods can seem daunting, but breaking it down into manageable steps makes the process much easier. First, loosen the lug nuts on the wheels you'll be working on. Then, jack up the vehicle and secure it with jack stands. Remove the wheels and locate the inner tie rod. Disconnect the outer tie rod end from the steering knuckle using a pickle fork or tie rod separator. Next, remove the old inner tie rod using the inner tie rod tool.
Before installing the new inner tie rod, apply grease to the ball joint and threads. Install the new tie rod and torque it to the manufacturer's specifications. Reconnect the outer tie rod end and install a new cotter pin. Repeat the process on the other side of the vehicle if necessary.
Once you've completed the replacement, lower the vehicle and tighten the lug nuts. Finally, schedule a wheel alignment to ensure proper steering and tire wear. Remember to consult your vehicle's repair manual for specific instructions and torque specifications. Taking your time and following each step carefully will help you achieve a successful repair.
Tips for a Smooth Inner Tie Rod Replacement
Preparation is key to a smooth inner tie rod replacement. Before you even start, gather all the necessary tools and materials and familiarize yourself with the repair procedure. Watch videos, read articles, and consult with experienced mechanics if needed.
When disconnecting the outer tie rod end, be careful not to damage the threads. Use a pickle fork or tie rod separator to avoid damaging the ball joint boot. When installing the new inner tie rod, make sure to apply grease to the ball joint and threads. This will help prevent corrosion and ensure smooth operation.
Pay close attention to the torque specifications when tightening the tie rod end. Over-tightening or under-tightening can lead to premature failure. Use a calibrated torque wrench for accuracy. Finally, don't forget to schedule a wheel alignment after the repair. This is essential for proper steering and tire wear.
Safety Precautions When Replacing Inner Tie Rods
Safety should always be your top priority when working on your vehicle. Before you even touch a wrench, make sure to wear safety glasses to protect your eyes from debris. Use jack stands to support the vehicle securely. Never work under a car supported only by a jack.
Disconnect the negative battery cable to prevent accidental electrical shocks. Wear gloves to protect your hands from grease and sharp edges. Work in a well-ventilated area to avoid breathing in harmful fumes.
If you're working with power tools, make sure to follow the manufacturer's instructions and wear appropriate safety gear. Dispose of used parts and fluids properly. Finally, if you're unsure about any step of the repair, consult with a qualified mechanic. It's always better to be safe than sorry.
Fun Facts About Tie Rods
Did you know that tie rods are a crucial component of your car's steering system, responsible for transferring the motion from the steering wheel to the wheels? They play a vital role in ensuring precise and responsive steering. The lifespan of a tie rod can vary depending on driving conditions, maintenance, and the quality of the parts.
Some vehicles have adjustable tie rods, allowing for fine-tuning of the wheel alignment. This is particularly important for performance cars and vehicles that are used for racing. Tie rods are subjected to significant stress and wear over time. Regular inspections and maintenance are essential to prevent premature failure.
Interestingly, the term "tie rod" is not exclusive to automotive applications. Similar components are used in various other machines and mechanisms to transmit force and motion. The basic principle remains the same, regardless of the application.
How to Replace Inner Tie Rods
Replacing inner tie rods involves a series of steps that require careful attention to detail. Start by loosening the lug nuts and jacking up the vehicle, securing it with jack stands. Remove the wheel and disconnect the outer tie rod end using a pickle fork or tie rod separator.
Next, remove the old inner tie rod using the inner tie rod tool. Install the new tie rod, applying grease to the ball joint and threads. Torque the tie rod to the manufacturer's specifications. Reconnect the outer tie rod end and install a new cotter pin.
Repeat the process on the other side of the vehicle if necessary. Lower the vehicle and tighten the lug nuts. Finally, schedule a wheel alignment to ensure proper steering and tire wear. Remember to consult your vehicle's repair manual for specific instructions and torque specifications.
What if You Mess Up Replacing Inner Tie Rods?
Making a mistake during an inner tie rod replacement can have serious consequences, potentially compromising your safety and damaging your vehicle. If you over-tighten the tie rod end, you could damage the threads or the ball joint, leading to premature failure. Under-tightening can cause the tie rod to loosen, resulting in sloppy steering and potential loss of control.
If you damage the steering rack boot, it can expose the steering rack to dirt and debris, leading to premature wear and failure. If you fail to schedule a wheel alignment after the repair, it can cause uneven tire wear and affect handling.
In the worst-case scenario, a failed tie rod can lead to a loss of steering control, resulting in an accident. If you're unsure about any step of the repair, it's always best to consult with a qualified mechanic. They can inspect your work and ensure that everything is done correctly.
Listicle of Benefits of Replacing Inner Tie Rods
1. Improved Steering Response: Replacing worn inner tie rods restores the precision and responsiveness of your steering.
- Enhanced Safety: A properly functioning steering system is crucial for safe driving, preventing accidents and ensuring control.
- Reduced Tire Wear: Worn tie rods can cause uneven tire wear, leading to premature replacement.
- Cost Savings: DIY replacement can save you money on labor costs compared to a professional repair.
- Increased Confidence: Successfully completing this repair can boost your confidence in your DIY abilities.
- Smoother Ride: Replacing worn tie rods can eliminate vibrations and clunking noises, resulting in a smoother ride.
- Prevent Further Damage: Addressing tie rod issues promptly can prevent damage to other steering components.
- Extended Vehicle Life: Maintaining your steering system can extend the overall lifespan of your vehicle.
- Better Fuel Economy: Proper wheel alignment, achieved after tie rod replacement, can improve fuel economy.
- Peace of Mind: Knowing that your steering system is in good condition provides peace of mind while driving.
Question and Answer Section
Q: How do I know if my inner tie rods are bad?
A: Common symptoms include loose steering, uneven tire wear, vibrations in the steering wheel, and clunking noises, especially when turning.
Q: Can I drive with bad inner tie rods?
A: It's not recommended. Driving with bad tie rods can be dangerous and can lead to a loss of steering control.
Q: How much does it cost to replace inner tie rods?
A: The cost can vary depending on the vehicle and the mechanic, but DIY replacement can save you money on labor costs.
Q: Do I need a wheel alignment after replacing inner tie rods?
A: Yes, a wheel alignment is essential after replacing inner tie rods to ensure proper steering and tire wear.
Conclusion of Replacing Inner Tie Rods: DIY Guide for Confident Repairs
Replacing your inner tie rods is a challenging but achievable DIY project that can save you money and provide a sense of accomplishment. By following this guide, gathering the necessary tools and materials, and prioritizing safety, you can confidently tackle this repair. Remember to consult your vehicle's repair manual for specific instructions and torque specifications. If you're unsure about any step of the process, don't hesitate to consult with a qualified mechanic. With careful planning and execution, you can restore your vehicle's steering to its optimal condition and enjoy a safe and comfortable ride.